Can’t Get Enough of Green

With sincere apologies to Kermit the frog…It’s beautiful being green…

As I look back on my history of painting vintage furniture it obvious I just can’t get enough of green painted furniture.

These next nine pieces shown below all painted in various shades of green shown some of are my own projects. They were all bought, restored, painted and waxed by me and all were done the first year I was painting and selling my chalk painted pieces.

OLYMPUS DIGITAL CAMERA

OLYMPUS DIGITAL CAMERA

OLYMPUS DIGITAL CAMERA

OLYMPUS DIGITAL CAMERA

green-stool-fter

OLYMPUS DIGITAL CAMERA

OLYMPUS DIGITAL CAMERA

OLYMPUS DIGITAL CAMERA


OLYMPUS DIGITAL CAMERA

Then this week I read on Houzz that forest green is a “trending” color right now. http://www.houzz.com/ideabooks/80942265/list/shop-houzz-3-trending-palettes-for-forest-green

These photographs below are from my Pinterest file titled Green Furniture. I love, love, love these vintage pieces shown below…

gallery-1486072744-clx0312060a-1

102-green-buffet

green-benches

light-waxed-then-dark-wax-table

At the Small House green is the new black!

Small House Big Sky Homesteader, Donna

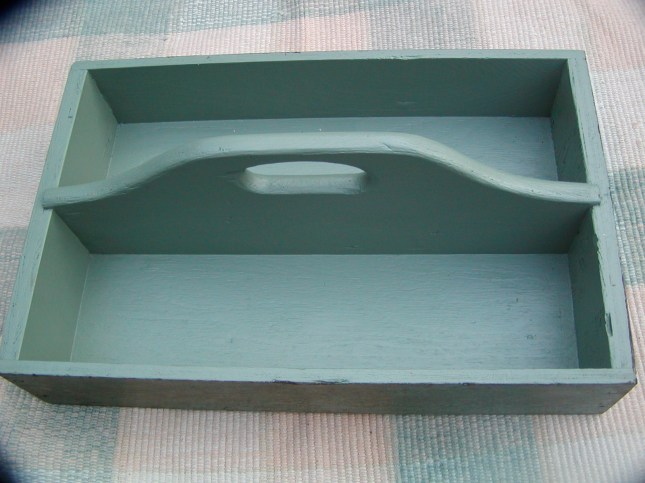
Vintage Vibe Magazine Holder

By now you have figured out I REALLY have a thing for vintage furniture.

And today, I finished another vintage piece, this time a magazine holder. Today I waxed the green on green vintage magazine holder I’ve been slowly working on.

It’s been several years now since I began this piece but it for some reason it got put on the back burner. This piece sat in my studio for a couple of years half-way painted but never finished. No real reason… just a lack of time, energy or motivation I guess.

img_7710

The magazine holder, “after.”

I’m thinking of decorating the front with something special, probably using a stencil and gray or black paint but I’m not sure exactly what stencil yet.

vintage-breeze-stencil-magazine-holder

Not this exact stencil but something simple and similar in feeling to this. 

When I found myself missing the painting gig this winter, I began to make time to work on a few unfinished projects still in my studio. And once again green chalk paint has really become my thing.

unfinished-magazine-holder-from-pinterest

I forgot to take a “before” photo of the magazine rack but this one is similar.

When I bought this piece it was painted a shiny red and black and quite frankly, it was ugly! But I’ve painted enough ugly pieces over the year that I knew that with some paint and TLC it could be made pretty again. Although my paint stash is running low and my choice of chalk color paint is quite limited, I did have enough Michigan Pine green left to complete this project.

stand-magazine-holder-from-pinteret

Another magazine holder from a similar era found on Pinterest. 

spindle-closest-use

Light green and dark green paint make a subtle but pretty contrast.

It took multiple coats of green chalk paint to cover up that bright red glossy paint, but it worked. I really adore the dark green with light green accents and the contrast this had made. It is really a pretty combination in my opinion. I especially I LOVE the turned legs on this piece that reminds me of the spindles on the Jenny Lind bed I bought for my son’s when they were babies.

two-tones-egs-close-use

Another view of the contrast between the greens.

This piece also sent also me on a hunt for similar magazine holders on Pinterest and I found a lot of them; both tall and squat, on legs and with no legs, painted, decopaged and decorated and more. I have saved over 100 versions of the painted magazine rack on my Pinterest board titled, Vintage Magazine Holders. Feel free to visit that!

In fact, I noticed today that I have four different boards, with the title Vintage in it!

Although this piece is technically a magazine holder, I imagine it could can be used to contain numerous other items like maybe holding towels, linens, platters, a laptop and more. What else do you think this magazine holder might hold?

I find there is gracefulness to these older pieces that makes them lovely to look at as well as still functional.

Viva la vintage!!

Small House Big Sky Homesteader, Donna

Why we Left the Middle Class

This copied piece came up in my news feed today (see below.) The main theme of the conversation was about why the middle class still matters. This set me to thinking. This also set me to writing this piece. “Why I Choose to Leave the Middle Class” and sharing this with Frontline.

pool-house-in-the-fog

Our simple country style pool and pool shack.

What’s the state of the American economy? What are the forces shaping it? And where do you see yourself in it?

Last March, FRONTLINE, APM’s Marketplace and PBS NewsHour joined forces to investigate America’s economic reality in a series called How the Deck Is Stacked.

Over the past year, we’ve crisscrossed the country, producing short films, radio reports and written stories that explore how a sense of economic unease has persisted for many people, despite an unemployment rate that’s below five percent and other positive big-picture indicators.

As this year-long reporting effort draws to a close, explore some of the stories we’ve told:
  • For years, interest rates have been down to stimulate economic growth. Now, under President Donald Trump, they may be set for the most dramatic rise we’ve seen in eight years. Here’s why.

Thank you, as always, for watching, reading and listening, and for letting us know what you think.

–  Patrice Taddonio

Assistant Director of Audience Development, FRONTLINE

March 1, 2017

Dear Frontline Editors:

I watched you recent program titled How the Deck is Stacked. I have some thoughts and experiences to share with you.

My husband (age 72) and I (age 67) are retired and the due to my autoimmune illness two of us are living on basically on one retirement. We raised and educated our four children from our first marriages. We were both divorced at mid-life, remarried each other starting over at ages 50 and 45 and like many in our community we are struggling as we age.

The only reason we are surviving is because 15 years ago I predicted that we were going to have to become more self-reliant if we were to survive during our retirement years. We moved from the city (with high taxes and ever-increasing prices) to very rural Allegan County, MI (the largest agricultural county in our state and began to homestead with few sevices and lower property taxes.)

Forr nine of those years my husband made the long drive into the city for his job while I stayed home and renovated our old home, began a small home based business and started our garden. My job was to create a comfortable and healthy new life for us here.

We keep chickens for eggs, raise vegetables, DYI whenever possible and buy our food that we can’t grow directly from the farmer (at wholesale) and our clothes and household items from Goodwill, auctions or a flea market. Here no one cares what we wear, or if our hair is cut and colored in an expensive salon with a $120.00 price tag or by our $12.00 per hair gal in her home-based shop. For us silver is the new black.

Our entertainment is working in our garden, playing with our chickens, walking our dog in the Allegan Forest or picking in-season fruit and freezing it. We read, we birdwatch and we listen to music or NPR on the radio. We have no Smart Phones, no Cable TV, no big screen televisions, no air conditioning, no vacations, no new vehicles and keep our life as simple as we can. We have not been to a movie theater in over 15 years. We still watch DVD on our ancient DVD player. Our one big splurge is our once a week $9.00 yoga class.

Our biggest expense now is trying to pay for our out-of-pocket health care needs and healthy organic food. We paid out over $12,000 alone in out-of-pocket medical costs in 2016 and had to draw out our savings and retirement funds to do that. Maintaining our aging 1950’s home and 5-acre property is a constant challenge too as we age. In spite of these challenges I try everyday to maintain a positive outlook and be grateful for the small things in life.

Our primary values are to live our life now as mindfully as possible, is to make choices that benefit the land, the birds and our health. We believe in sustainability, living simply, protecting the earth, the air, the water and above all people over profits.

We left middle class America by choice. I felt it was our only option to survive.

Donna Allgaier-Lamberti https://smallhousebigskyhomestead.wordpress.com


Healing Room Update

I finally have taken updated photographs of my healing room. This rooms decor started with this chalk painted green and red desk and patterned rug and evolved into this.

desk-wall

This vintage garage sale vanity is repurposed into my desk. This pillow is a resale shop find.

When using essential oil and hot water, being washable is critical. This means cotton sheets on the massage table and a washable duckcloth throw on my old wingback chair.bed-and-bookcase

 Bookcases hold massage supplies and materials in one contained space. 

This room is multi-functional as acts a my office, massage room and NewRife treatment room.

massage-table

My goal was for this room to be happy and cozy at the same time. I bought those vintage lamp on my desk for $7.00 at a flea market many years ago and after deciding on the red and green colors I found these new lampshades.

ironing-chair-cover

Be aware that cotton slip covers require a lot of ironing to keep them crisp!

It’s all about budget decorating at the Small House Homestead.

Thanks for following!

Small House Big Sky Homesteader, Donna


Easy Lamp Revamp

Apparently this is my winter for lamp make-overs!

Last month I painted a stained lampshade to update a pretty blue canning jar lamp and today I chalk painted and waxed two out-of-date 1960’s brass lamp bases. My bedroom lamps are not old enough to qualify for vintage but they are certainly not new either.

curtai-in-corner-and-spread-nice

Here is the “before” shiny brass lamp with its old pleated shade. 

The pleated shades are quite dated and because they are a light weight fabric and pleated they collect dust and are a pain to keep vacuumed.

OLYMPUS DIGITAL CAMERA

braas-lamps-before-use

Enter a caption

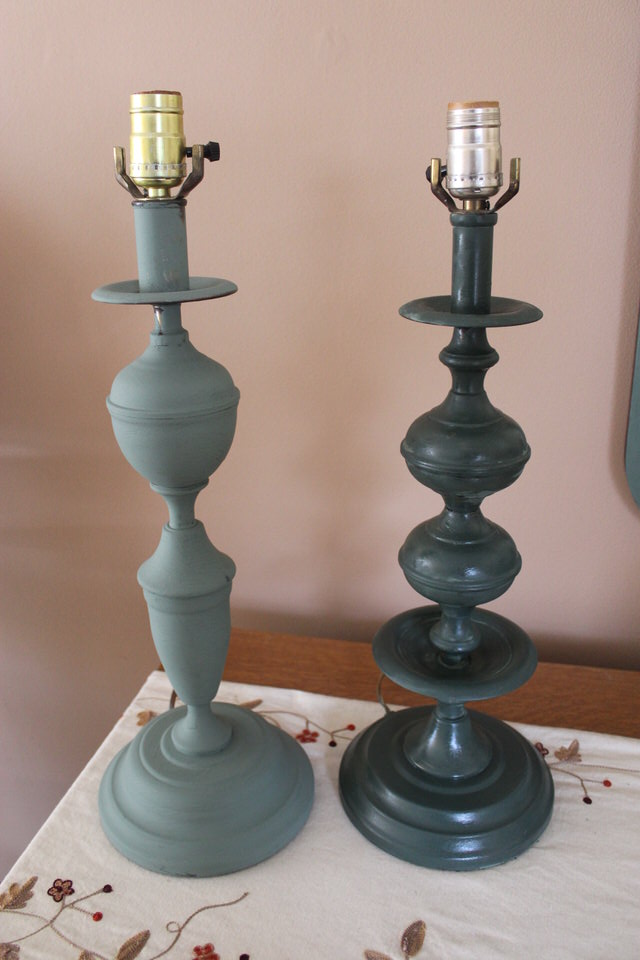
Both lamps bases before the recent make-over.

I have been looking at new lamps at Home Depot and on the Internet and I fell in love with this wooden artisan-shape lampbase (which I would have painted or more likely washed using my watered down green chalk paint.) But when I realized each lamp cost $125.00 plus shipping and that I needed two of them I knew new lamps were not going to be in my current budget.

And besides I don’t want my lamps to look too matchy-matchy, right?

r5957kethy-ireland-wood-base-lamp

A Kathy Ireland designed lamp with the look of a hand-turned base. So pretty.

So instead I bought two new lampshades at Home Depot at $19.95 each and painted the lampbases I already had. I would have preferred a drum-shaped style shade but the size I needed did not come in that shape. I also needed a shade large enough and deep enough to cover up the brass screw in the lightbulb part so this was the only shade that actually fit my older style lamps.

brass-lamp-close-use

A close up of the shiny brass look that was popular in the 70’s & 80’s.

My choice of shades colors was a bit limited but these marbled tan shades will do the trick and will certainly freshen up our bookshelf headboard and provide some nice contrast of the dark green paint against our medium green painted wall.

one-waxed-one-unwaxed-use

Left lamp based painted right hand side base painted and waxed.

I crawl into bed early every night to read and wind down so these lamps get quite a workout in my home.

  • MY STEP BY STEP:
  • I started off by washing the bases well to remove any dust or gunk that might have settled there over the past few decades.
  • Then I brushed on the Ce Ce Caldwell’s Michigan Pine chalk paint just covering them with one coat because I wanted some small bits of brass to show through for contrast.
  • Then I waxed each base using Ce Ce Caldwell’s Aging Wax using a rag to apply the wax because my waxing brush was too stiff to get the wax into the cracks and crevices. See more information here; http://www.cececaldwells.com

I was torn between waxing and not waxing because I like them both ways so I  sat with them a few days until I made up my mind.

lamps-being-painted-inkitchen-use

The painted lamps bases in process in my kitchen.

Finally I waxed them both and this Ce Ce Caldwell’s wax took forever to dry. I’m not at all sure I like that slow-drying trait. It took the wax longer to dry than the chalk paint itself which dries in less than an hour!

I put on the new shades, took a few photographs and put them into place in my bedroom. This project was very easy to do and only took me one day (except for the wax drying which took more than a week) so my “satisfaction rating” is high. LOL!

This is budget-based decorating at its best!

green-lamp-on-dining-room-dresseer

Do you have any lamp bases or shades you might like to paint?

Small House Big Sky Homesteader, Donna

Tweaking My Healing Room

My husband and I made a huge decision this month and that was to purchase and commit to using the TrueRIFE Frequency Technology. http://www.truerife.com/

This has been on our minds for many months now and the only hold up, was of course, finding the money.

I used a friends TrueRIFE machine several years ago when I was seriously poisoned by working in a mold-filled factory. I was a very sick woman during the timeframe of 2008-2012. I believe now that the mold exposure was the trigger that set me up for the Hashimoto’s’ Thyroiditis and the autoimmune health issues I am now facing. I credit my the NewRIFE machine and my friend with saving my life.

We looked at several other options for healing including using the Ozone Sauna and IV chelation for detox but their were several roadblocks. Driving long distances and the long and exhausting day on the road several times a week is moe than I can tolerate most weeks.  I found on these exhausting days on the road it was really hard to get my fluids, my supplements and to eat properly. I would come home totally depleted and exhausted and it would take me two or three days of rest to catch up.

We ultimately decided to buy this machine and use this technology in the comfort of our own home. I know this will increase its usage while giving us the freedom to take care of our animals, our property and our own nutritional needs.

We started out using the RIFE equipment in our living room but that made for a rumpled and messy corner to live with 24/7 and I soon realized that I needed to come up with another plan. This looked too much like a hospital room for my tastes!

Living with that mess was starting to mess with my mind, interfering with my ability to concentrate, function normally and was, quite frankly, driving me a bit crazy. Not a good sign.

rife-in-living-room

This was the mess in my living room that gave me the idea to move it into my healing room. 

Yesterday we rearranged my healing room to accommodate the RIFE equipment cart and a wing back chair from our old Kalamazoo home that has been in storage. This chair is a bit larger than I would like for the size of my room, but it will fit people of all sizes, provide ample support and best of all I won’t have to purchase a new chair.

red-cart-in-hallway-use

My colorful new red cart will hold the NewRIFE equipment and keep everything in one place.

This week I ordered a pretty red canvas duck slipcover for my old wing back chair to help to make the healing room be more inviting, pretty and to hopefully boost the spirit of all who enter. I know it will do that for me.

Yes, a chair that size makes is a tight squeeze in this room now but I think we can make it work. And I did not have to buy another chair, which is another bonus. This image shows the on-line photo of the slipcover, not my healing room unfortunately. My room is painted in a deep and restful green paint and when the shades are drawn the room is dark enough for a deep and relaxing massage.

a9e48745-b1e3-4d3d-bee5-9a3d72a0b3fc_1-f5f1e8deafb5ae759c409abdb7b26670

I love this cheerful red color and hope this will help draw me into the room each day.

This is a fairly inexpensive slip cover costing right around $50.00 with free shipping.  I ordered it on-line from Walmart.com and it was made by Surefit one of the long-time and well know slipcover companies. This cover is washable, another plus.

I now have a massage table, my office and the NewRIFE equipment in my healing room.

Our self-healing is a huge part of our life right now so having a room dedicated to this just makes sense for us. We each receive one to two sessions each day. I know that having this technology here in the comfort of our own home will make all the difference between doing our treatments and not doing them.

As soon as the new slipcover arrives I’ll post images of it in my healing room.

Small House Big Sky Homesteader and Healer, Donna

The Autoimmune Summit Starts

TODAY!!!

The on-line Autoimmune Revolution Summit starts today, January 30th. This FREE educational program runs through February 7th. Register at hto:/care/air

I’ve cleared my calendar and plan on listening to as many sessions as I can each day.  I have written several blog posts ahead of time and will post them through my sabbatical as I get them edited, completed and on-line.

I invite you to join me in listening to this life-altering program. The current research projects that autoimmune disease is the new cancer and that this is going to be the new health epidemic of the future. We must all work to get the word out.

Autoimmune diseases and the physical, chemical and emotional pain they create impacts millions around the world. The primary way doctors treat these diseases today is to prescribe immune suppressing drugs. Unfortunately, this approach has failed to achieve a meaningful outcome and has created an even greater health crisis — what Dr. Peter Osborne calls “The Prescription Pain Trap” — which you will learn more about during this event.

There are now toxins everywhere in our words; in the air, the water the soil and in our food. And unfortunately there is no magic pill to save our thyroid glands. We must instead take responsibility for healing ourselves and for working in partnership with specialists and fight for our own health. We must inform ourselves, empower ourselves and takes the measure necessary to stop this painful and debilitating condition before our thyroid stops working and our bodies then begin to attack our own thyroid.

Don‘t miss all the great talks and interviews that start MONDAY, January 30th. Each talk is free for just 24 hours and after that if you like you can purchase a DVD from the program to listen to over and over and to share with your family and friends.

Here are the details for Healthtalk On-Lines site:

Each day’s talks will be available for free on demand for a 24-hour period. They begin at 10 A.M. U.S. Eastern (New York time) and end the next day at 9:59 A.M. Once a 24-hour period has ended, those talks are only available on Encore Day or by purchasing access to them.

We’ve put a countdown clock on each day’s page to tell you how much time you have left to watch.

USE THE LINK BELOW TO ACCESS EACH DAY’S TALKS* <–
(you may need to clear your browser history each day)
http://autoimmunerevolution.org/event
*NOTE: This link will not be active until the summit starts!

DAILY PRESENTATIONS
Each day’s talks will be available for free on demand for a 24-hour period. They begin at 10 A.M. U.S. Eastern (New York time) and end the next day at 9:59 A.M. Once a 24-hour period has ended, those talks are only available on Encore Day or by purchasing access to them.

We’ve put a countdown clock on each day’s page to tell you how much time you have left to watch.

–> USE THE LINK BELOW TO ACCESS EACH DAY’S TALKS* <–
(you may need to clear your browser history each day)
http://autoimmunerevolution.org/event
*NOTE: This link will not be active until the summit starts!

Small House Autoimmune Warrior, Donna

My DYI Chalk Painted Lampshade

I tried a little experiment today.

I had a seriously discolored lampshade on a DYI lamp that I put together a couple of decades ago from an old canning jar and stones. I was visiting a hardware shop in Shipshewana, Indiana and purchased a DYI lamp making kit.

close-maybe

I photographed this image so that you could see the cord set-up coming out from under the shade. That’s my handmade paper on canvas artwork on the wall behind this vignette.

I found this large quart Ball jar and added the screw on lid, added some pretty black stones I had gathered and I had a small-scale lamp. I was a young bride and I was pretty proud of myself then.

I noticed this past week that the white replacement lampshade was mottled and discolored. I automatically set it aside to go to Lowe’s with the intent of purchasing a new shape. Then it occurred to me, why not try to paint it before I discarded it? I even had the same color chalk paint that I used on the dresser turned family room storage unit that it sits on.

shows-canning-jar-lid-cord-use

I have successfully used chalk paint on wood, metal, and a vintage leather top table so why not give it a try? It was incredibly easy to do. I watered the paint down very lightly, used a regular paint brush and painted it on taking care not to load too much paint on the glued edge.

I am really pleased as how the fabric took the paint. Not only does it cover the stains beautifully the finished shade has a lovely velvety look to it.

ball-perfect-mason

A vintage Ball Perfect Mason jar holds Petoskey stones I gathered over the years.

This little trick save me the cost of a new lampshade and even more important it saved me over an hour’s drive to get to the closet home improvement store. It also saved a lampshade from going into the landfill. What a win-win!

chest-in-between-windows

A repurposed and painted gentleman’s chest in maple wood and sea foam green chalk paint adds a bit of pop to the window wall in our family room as well as needed extra storage. This chest which is adjacent to a bathroom is filled with TP and paper towels!

This is one DYI experiment that worked!

Small House Homesteader, Donna

Finding the Courage to Paint my Island

I’ve have wanted to paint my kitchen island for a long time now. But I have had this irrational fear of a future buyer (most likely my age) not buying my home because my kitchen island is now chalk painted. I know this is crazy but honestly this is how I have felt. I know it’s only paint but the fear of a future buyer being turned off by the idea of a painted island has stopped me in my tracks every time.

island-tight-with-towel-bar

My maple island “before” its current transformation.

But every decorating magazine or book I pick up shows the kitchen island painted a lovely color,, a look I adore and I LOVE-LOVE-LOVE chalk painted furniture. This week I finally decided to forge ahead and paint it anyway. This kitchen island will stay here while any of my other painted furniture pieces will be sold or go with me to our new place, wherever and whenever that will be.

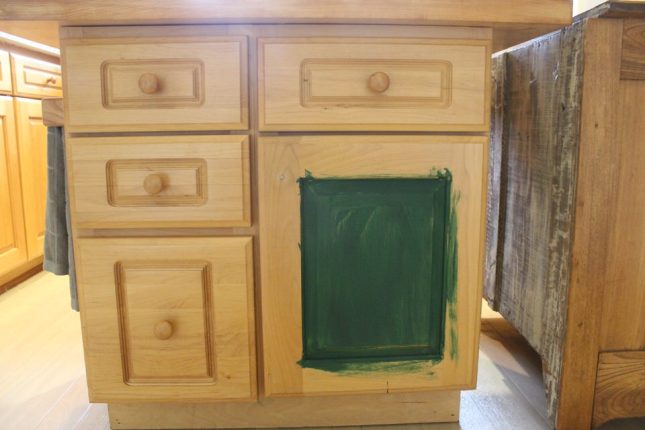
I do love my maple kitchen cupboards and am grateful to have such a lovely kitchen to cook in but if there is such a thing as too much wood in one room then this room is definitely the poster child for that. I knew I wanted a deep dark green and that I was going to start by painting and waxing the drawers. I would leave the sides maple to start. I often paint furniture in a two-tone kind of way leaving quite a bit of the natural wood showing and this is my way to test the waters, so to speak.

shot-downward-use

The finished island with its original maple pulls put back on. It looks like I had better stain and polyurethane the back of the second chest!!

I purchased a quart of chalk paint by Annie Sloan in the new color called Amsterdam Green. Roadblock # 1: I did not like that shade of green color. It was just too Christmassy green for my room. So I reverted back to my old favorite stand-by Michigan Pine green, by CeCe Caldwell. I had just about enough left to accomplish my goal.

I quickly realised that Michigan Pine green is a much better choice of green for our home and especially for the deep shade of green found in my green, rust, gold and brown runner that lies in front of this island. My area rugs were chosen with dogs and our homesteads ample outdoor dirt in mind!

rug-close-up

This runner has a forest green color that just works with the Michigan pine chalk paint. 

img_7376

This is the Amsterdamn Green that was too christmassy looking for my tastes.

We put down a light-colored bleached wood look linoleum floor throughout our home when we moved here in 2000. When we moved here Small House had a country-practical dark brown carpet and the space look way to dark for my taste.

This linoleum is laid using three varying sizes of linoleum strips that make it look just like wood to most guest eyes. This runner was put down when my Labrador Retriever Spirit started aging and was having trouble managing the slippery floors. This runner also keeps my granddaughters from tripping and falling to.

My original plan was to take it slow and paint just the island front and then wax it with black wax. I know I can always paint the other sides later on if I really like this new look.

island-and-stove-vent-use

My newly “tweeked” kitchen with the repurposed maple shelves, the black stove vent newly painted and kitchen island adorned in Michigan Pine chalk paint. 

Yes, I know that using dark wax directly over paint goes against the “rules” of chalk painting but I do this all the time.  I love how it look when completed to. Just call me a chalk painting rebel!

Yes, all the directions tell you to wax with clear wax first and then wax with dark wax but that is not how I do it. I like dark wax right over the paint. I expect to put the old maple wood pulls back on but I will see how that looks and decide if I will go safe or make a change to go a bit more spiffy with new pulls.

angle-medium-nice

I extended my storage space by adding an antique chest. This piece holds placematts, linen napkins, candles and tall vases that my homes lack of storage cannot house. 

What do you think? Do you like it painted green?

Small House Big Sky Homesteader, Donna


Spray Painting the Range Hood

It only took me fifteen years but I finally got our old beige colored stove hood re-painted. I wanted it to be refreshed and black like the rest of my appliances for a number of years now. My goal was improve the look of the vent so it coordinated better with the other appliances and give it a nice refresh.

island-and-stove-vent-use

The shiny black appliance paint looks almost like I bought it new. 

When we had our roof re-shingled last year I made sure that my stove vent was working properly and that the cooking odors were successful venting from the kitchen out through the roof. It is functioning just fine in every way but definitely needed a little bit more pep in its step.

ithe-guys-working-ont-he-project

The guys work together to get this hung and reattached. 

Now that I am healthy scratch cooking for two special diet protocols I spend a LOT of time in my kitchen prepping and cooking so I like it to feel good to be working in as well as to work correctly.

kitchen-long-short-full-view

This is full view of my country kitchen.

When we moved into the Small House this property was what is called “an estate.” This means that the people who lived here had passed away and left the property to their children. This also meant we were buying this house and outbuildings in an “as is” condition.

This house came with a 1980’s beige colored stove, fridge, dishwasher and a washer and dryer. I AM grateful that this home came with working appliances because that allowed us to save for new ones.

While Gene was still working fulltime at his City of Kalamazoo job, we saved up enough cash in a few years to replace the stove, fridge and dishwasher. After we had achieved that goal that we sold the old ones locally.

I had wanted though about purchasing a new black stove hood but they were quite a bit over my budget and we had so many other repairs that we needed first, like the entire septic system within the first three months of moving here. I’ve even considered stainless steel appliances until I saw their high price tag and that quickly nixed that idea.

So plan B was to get the range hood painted black by taking it to a car paint shop. But I had to disconnect the electrical, take it off, deliver it and then pick it up and that simply never happened. I considered have a wooden cover built or painting the vent hood using chalk paint but with both options I was concerned about keeping them clean. Stoves can be a greasy place for sure.

Then one day I was reading a magazine and discovered a Rust-Oleum Appliance Epoxy spray paint. This paint can be purchased in white and black and is designed originally for those who want to change out an appliance panel.

The light bulb in my head went off. Why not use this paint to refresh my old-style stove vent hood? This paint was only $3.99 a can. On a recent trip to Lowes, I bought three cans just to be sure I had enough.

Since it was winter and cold in Gene’s workshop this was a project I asked our handyman Frank to tackle this project for me. Frank has a heated workshop and was happy to do this for us. He came, dismantled the hood and took it home with him to clean, sand, paint and reassemble.

In a couple of weeks we had it back and reattached. In addition to painting the outside Frank thoroughly cleaned off the metal grills and degreased the entire unit. What a guy!

I’m happy to have my stove vent back so now I can reconnect the smoke alarm. With the vent out of commission I kept sending the smoke alarm into the noisy”danger”zone.

Doesn’t this look nice? The entire project cost me less than $50.00 and was worth every penny. This defintely quilifies as debt-free living!

Small House Big Sky Homesteader, Donna